
Linux and the command line#
This week, there are three notebooks: this one, which explains you some features of Linux and how to work with its command line (CMD), and two about first-level and run-level analyses.
What you’ll learn: after this lab, you’ll …
know some basic Linux commands related to navigating the operating system;
be able to call FSL functions from the command line
Estimated time needed to complete: 1-2 hours
Creating a remote desktop instance#
Like the previous labs, we will use notebooks to explain the most important concepts of the assigned material in the upcoming weeks. However, in addition, we’re also going to use FSL, a software package dedicated to (f)MRI analysis. Most FSL tools have both a “command line interface” (CLI) and a “graphical user interface” (GUI). We’ll explain you later in the lab what this means.
Anyway, we unfortunately cannot use GUI-based FSL tools from Jupyter notebooks. To use FSL GUIs, we need to create a “remote desktop” instance of the server using X2Go, which gives you access to a terminal with a “command line”.
Note that you might experience a bit of “lag” with the remote desktop instance. This is, unfortunately, an unavoidable annoyance with remote desktop software, which is usually caused by an unstable or (relatively) slow internet connection.
Anyway, if you successfully created a remote desktop instance, you should see something similar to the image below:
Now, this interface is probably quite similar to the interface of your own Mac/Windows laptop: it has a file navigator (“Caja”, similar to Windows’ “explorer” and Mac’s “Finder”), a browser (Firefox), and several programs (e.g., FileZilla for file transfer, a calculator, etc.). However, instead of using the server’s functionalities manually (i.e., by clicking on stuff), we’re going to use a “terminal” to work with the command line.
The command line is software that allows you to programatically control your operating system (amongst other things). Using specific Linux commands, you can for example navigate through your filesystem (e.g., go into the week_5 folder) or copy/rename/remove files. In addition to built-in Linux commands, you can also interact with other software packages through the command line. FSL is an example of such software; many FSL tools have a command line interface, such that you can use them programatically from the command line. Check out the image below for an example of a built-in Linux command and a command calling an FSL-tool (bet):
In the next section, we’ll give you a quick tutorial to teach you some of the most important Linux commands that you need to efficiently use the command line.
A short tutorial about the Linux command line#
As explained, the command line allows you to do stuff by typing in specific commands. One example of such a command is pwd, which is short for “print working directory”. As you might guess, this prints out the directory you are currently in. If you open a terminal, you always start in your “home directory”, which is something like “/home/{your username}” (or /Users/{your username} for Mac users). Let’s check this is indeed the case.
Now, you also navigate through your filesystem using the command cd, which stands for “change directory”. For example, to go to the folder week_5, simply type: cd week_5. Note that this is always relative to your current directory!
If you call the command pwd again, you should see that your current directory updated to /home/{your username}/week_5. Note that if you want to go one folder back/higher (i.e., from /home/{your username}/week_5 back to /home/{your username}), you use the command: cd .. (in which the .. refers to the “parent directory”).
Another useful command is ls, which stands for “list” and lists the contents of a directory. To list the contents of your current directory, you can simply type ls.
Alright, let’s look at a (slightly) more complex command: cp, which stands for “copy”. As the name suggest, this command is able to copy files. Importantly, it takes “arguments” (input and output) and “flags” (options), in the form of:
cp input_filename output_filename [flags]
Like many other commands, cp takes (in this case two) mandatory arguments, in which the first is the file-to-be-copied and the second is the name you want the copied file to have. Then, after the two mandatory arguments, you can add optional “flags”, which are like options. You can recognize these “flags” by the single (or sometimes double) dash (-). For example, the flag “-v” (which refers to the option “verbose”) prints extra information upon calling cp. So, a call to the utility cp might look like: cp original_file copied_file -v.
Now, if you called ls in the previous ToDo, you should have seen that the week_5 directory contains a file some_file.txt.
''' Tests the above ToDo (but is not graded). Only run this after you've created the new file!'''
import os
from glob import glob

here = os.path.abspath('')
par_dir = os.path.basename(os.path.dirname(here))
if par_dir != 'solutions':  # must be a student-account
    try:
        assert(os.path.isfile('some_file_copy.txt'))
    except AssertionError as e:
        print("File 'some_file_copy.txt' doesnt't exist! I only found:\n%s" % (glob('*'), ))
        raise(e)
    else:
        print("Well done!")
Importantly, built-in Linux commands and other tools that interface with the command-line differ in which and how many arguments they expect and which flag you can optionally use. You can get more info on the expected arguments and possible flags by using the command with the --help flag, like:
cp --help
This prints out some information about the expected arguments and flags. However, while commands differ in which arguments and flags they expect, the structure of any command-line program (including FSL tools) is the same:
command arg_1 arg_2 arg_3 arg_N -flag
Note: don’t use cat with nifti files, as it will try to print millions of numbers to the terminal, which might cause it to crash!
Practice your CMD-skills with FSL#
As explained before, FSL has both a graphical user interface (GUI) and a command line interface (CLI). You can “access” the CLI in the terminal by typing the specific FSL-command followed by the (mandatory) input arguments.
Let’s start with a very simple example: the FSL command fslinfo. You can use this command to check out some basic information about nifti images (from their header), such as voxel size and number of volumes. You always call this command in combination with a filename:
fslinfo your_nifti_file.nii.gz
This may then print something like the following to your terminal window:
data_type       FLOAT32
dim1            80
dim2            80
dim3            44
dim4            50
datatype        16
pixdim1         2.700000
pixdim2         2.700000
pixdim3         2.970000
pixdim4         0.700000
cal_max         0.000000
cal_min         0.000000
file_type       NIFTI-1+
Here, dim[1,2,3,4] represents the number of points in each dimension (e.g., 80 voxels in the first dimension) and pixdim[1,2,3,4] represents the size/length of each point in each dimension (e.g., 2.7 mm in the first dimension and 0.7 seconds in the fourth/time dimension).
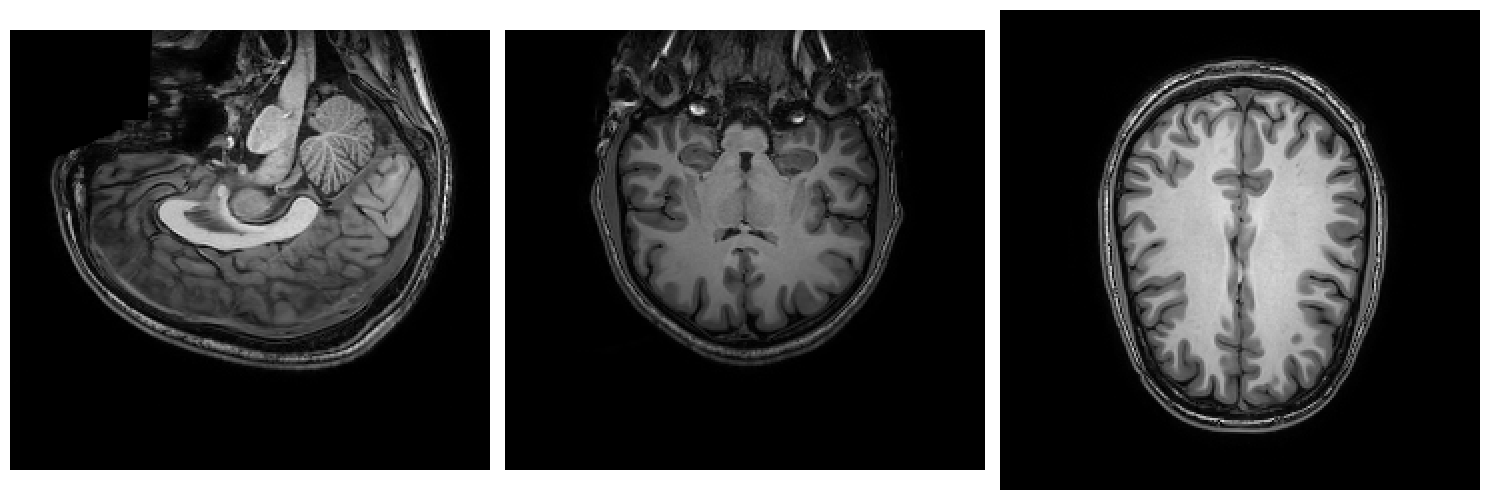
Let’s practice your command-line skills with another practical example. In the directory of this week’s lab (week_5), there is a T1-weighted structural image (t1w.nii.gz). Turns out, it is not in the “right” orientation, i.e., it is not in RAS+ orientation (left-to-Right, posterior-to-Anterior, and inferior-to-Superior), but the other way around! Below, we plot three slices (in three dimensions) of the file, so you can see what’s wrong with it:
import nibabel as nib
import numpy as np
import matplotlib.pyplot as plt
from niedu.global_utils import plot_ortho_slices
%matplotlib inline

t1 = nib.load('t1w.nii.gz').get_fdata()
plot_ortho_slices(t1);
Technically, it doesn’t really matter whether the file is upside down or not (as long as the corresponding affine is correct), but most software programs (like FSL) assume that they are in a standard RAS+ orientation. Fortunately, FSL has a tool to fix the orientation issue we have with our T1-weighted file: the fslreorient2std command. The format for this command is as follows:
fslreorient2std input_file output_file
where “input_file” should name the path to the input-file and “output_file” indicates what name you want to give to the output of the function (i.e., the correctly oriented file).
''' Tests the above ToDo. Here, we test whether the reorientation process worked.
The slices should not be upside down anymore. '''
if par_dir != 'solutions':  # must be student account
    if not os.path.isfile('t1w_reoriented.nii.gz'):
        raise ValueError("Cannot find the file 't1w_reoriented.nii.gz' - did you name it correctly?")
    t1 = nib.load('t1w_reoriented.nii.gz').get_fdata()
else:  # admin account
    t1 = nib.load('t1w.nii.gz').get_fdata()[::-1, ::-1, ::-1]

print("Well done!")
plot_ortho_slices(t1);
Alright, let’s practice your CMD skills with one more nifty (pun intended) FSL command called fslroi. This command allows you to slice your file in several dimensions. For example, you can use it to remove the upper 20 slices in the X direction or remove several volumes (i.e., slicing in the “Time” direction, the fourth dimension of functional data). Below, we loaded functional data from a very short run (only 12 volumes; usually, runs are of course often much longer). We’ll plot an axial slice for all 12 volumes below:
import numpy as np
func = nib.load('corrupted.nii.gz').get_fdata()

plt.figure(figsize=(15, 5))
for i in range(func.shape[-1]):
    plt.subplot(1, func.shape[-1], i+1)
    plt.imshow(func[:, :, 25, i].T, origin='lower', cmap='gray')
    plt.title('Vol %i' % i)
    plt.axis('off')
plt.tight_layout()

As you can see, something went wrong for the last two slices (slice 10 and slice 11, counting from zero), which only seem to contain some noise. This may be caused by, for example, reconstruction errors (converting data from K-space to image space). In the last ToDo of this notebook, you are going to use fslroi to cut off these two “corrupted” volumes. The format for fslroi is as follows:
Usage: fslroi <input_file> <output_file> <xmin> <xsize> <ymin> <ysize> <zmin> <zsize>
       fslroi <input_file> <output_file> <tmin> <tsize>

Note: indexing (in both time and space) starts with 0 not 1! Inputting -1 for a size
will set it to the full image extent for that dimension.
As you can see, fslroi always needs an input file (the first argument) and an output file (the second argument). Then, if you only want to slice in the time-direction, you specify two extra arguments: where you want to start slicing (i.e., tmin; the third argument) and the size of your slice (i.e., tsize; the fourth argument).
''' Tests the above ToDo. Here, you can check if your fslroi command worked!
It should show 10 volumes (vol 0-9), and the noise-volumes should be removed.'''

if par_dir != 'solutions':
    if not os.path.isfile('fixed.nii.gz'):
        raise ValueError("Cannot find the file 'fixed.nii.gz' - did you name it correctly?")
    func_fixed = nib.load('fixed.nii.gz').get_fdata()
else:
    func_fixed = nib.load('corrupted.nii.gz').get_fdata()[:, :, :, :-2]

plt.figure(figsize=(15, 5))
for i in range(func_fixed.shape[-1]):
    plt.subplot(1, func_fixed.shape[-1], i+1)
    plt.imshow(func_fixed[:, :, 25, i].T, origin='lower', cmap='gray')
    plt.title('Vol %i' % i)
    plt.axis('off')

plt.tight_layout()
print("Well done!")
(You might wonder: well, why use fslroi while I could simply use Python to cut off the last two volumes? That’s a good point. Here, we made you work with fslroi to practice your command line skills, but using Python to do this is completely fine too. Ultimately, if you work with real data, it’s up to you which software/programming language you want to use.)
Alright, enough practice with Linux, the command line, and FSL commands! You can start the other notebook (first_level_analysis.ipynb) now.